PART 1 : I'm a little bit obsessed
It's not hard to be, when it comes to dyeing with plants and food scraps. The idea of using the whole plant really appeals to me. When it comes to avocados, you not only get to enjoy eating the flesh, but you can use the skins and pips to make a beautiful dye. We also go through onions, and eat at least one every day. Once I've taken the skin off, I save it and chop and cook the rest. There's no wastage. I love that! Whenever I'm in the garden, I look at the dye potential of everything! I have so many dyeing plans in the works: I want to grow and dye with coreopsis, madder, woad, passionfruit marigold (Tagetes lemmonii, aka "Mexican Marigold"), hollyhock, cornflower, and Amaranthus "hopi red dye". There's not enough hours in my weekend to do all that I want to do. I'm sure that many of us experience this. The key is to be prepared, so you can make the most of the time that you have.
STEP ONE : THE TOOLS
The first thing to do is make sure you have the right basic gear. Obtaining gear does not have to be expensive. You can get a lot of the gear second-hand from op-shops, or from places like K-Mart and Trade-Me:
- a large dye-pot with lid (one that is stainless steel),
- a heat-source/element,
- tongs,
- large spoon,
- digital scale (with 1 gram increments). K-mart sells inexpensive ones
- a thermometer (I use a candy thermometer),
- pH testing strips,
- resuable cable-ties
- cotton or acrylic string to tie butterfly ties around the hank
- a nearby water source and sink,
- gloves,
- old towels and cloths,
- a drying rack or clothes-line.
- Also make sure you have adequate ventillation (you don't want to be breathing in fumes), so open those windows and doors.
From here on in, your pot and utensils are to be used for dyeing only, not cooking as well. You also need protein-based (animal) fibre to dye with and a mordant to pre-mordant the yarn with (I use potassium aluminium sulfate/potash alum). I also use Cream of Tartar to hold the pH and assist with brightening the colour of the dye.
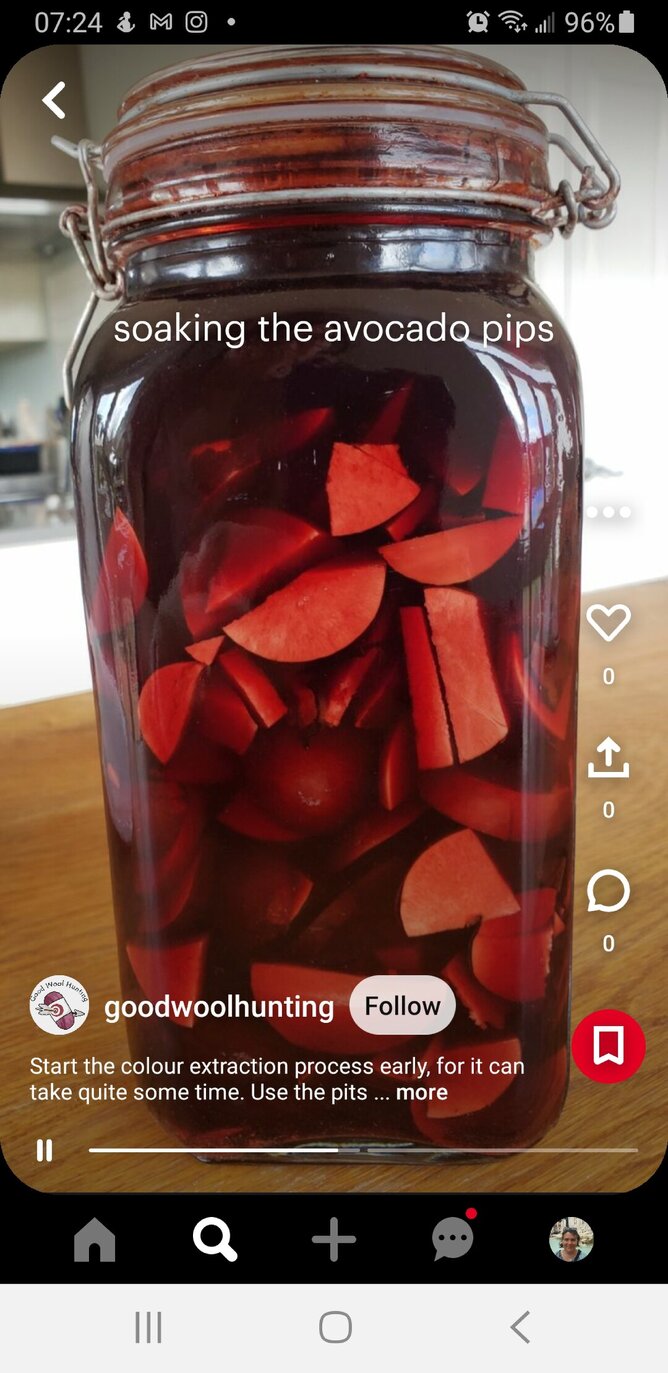
STEP TWO : EXTRACTING THE DYE (in this case, avocados!)
The key to extracting a fantastically pink colour is to raise the pH level of the water (ie. make it more alkaline). To do this we need washing soda (sodium carbonate, which can be bought from the laundry section at your local supermarket). In the meantime, kKeep those avocado skins and peels! You can either freeze them, or use them straight away. In a clean, large glass jar, place finely chopped avocado pips (at least 10-15) and/or cleaned peels (make sure all the green flesh is removed). The more the better. Pour over hot water until the large jar is three quarters full. Stir in washing soda a tablespoon at a time. Give it a good shake. After 5 minutes, test the pH level. Aim for a pH level of 10 or more. Don't hurry this step. You can see the colour coming out of the pips straight away, but to develop a great colour, it could take 2-3 weeks. Leave this jar on your kitchen bench, and give it a good shake periodically. It should be a lovely deep red colour.
STEP THREE : SCOUR AND PRE-MORDANT YOUR FIBRE
Mordanting is the most important process of preparing fibres to accept color. Using a mordant helps to ensure the most durable and long-lasting colors. Even before mordanting your yarn, you need to scour (wash) the wool [I won't be talking about the scouring and pre-mordanting process here, but there are many fantastic resources out there, including the book Wild Colour by Jenny Dean and instructional websites such as Botanical Colours : Scouring Animal Fibers. There are also very informative You Tube channels such as Myra Made Color and Trudi Pollard, an Australian textile artist].
Once you have the gear, you can start preparations! I advise having pre-prepared skeins at the ready. A wooden niddy noddy is a good investment, but you don't need to buy one, but can construct one out of PVC pipes. If your yarn comes in a skein already, you can begin by pre-mordanting your yarn.
Pour luke-warm water into a large pot. In a separate heat-proof container, measure 15 grams Alum for every 100g of wool you are going to dye, and 6 grams of Cream of Tartar for every 100g of wool you are planning to dye. (This is 15 grams Alum and is expressed as 15% WOF = Weight of Fibre and 6 grams Cream of Tartar expressed as 6% WOF). Add hot water and stir to dissolve. Add this disolved mixture to the luke-warm water in the large pot. Stir thoroughly. Then immerse the skein(s), making sure the fibre is submerged, and that there is room for the yarn to move in the pot. Apply heat, and hold the temperature to a level between 70 and 80 degrees celcius, and hold that temperature for one hour. The water should be steaming, but not bubbling. Keep the yarn submerged, and periodically gently use the cable-ties to alter the position of the yarn to ensure even coverage. Be careful not to agitate the skeins, otherwise you could cause felting and/or tangling the yarn. Be gentle with your motion (and also don't shock the yarn with sudden temperature changes, which can also cause felting).
Turn the heat off and allow the yarn to cool in the pot overnight. Squeeze out excess liquid, then when cool rinse in tap water of same temperature and squeeze again. Your yarn is now ready to dye! If you are not dyeing now you can keep it damp for a couple of days and dye it then, or dry the yarn and leave it for a future dye day.
Next up.... dye day!